Table of Contents
If you’re a tattoo artist, you know how important it is to create a high-quality, long-lasting tattoo for your clients. One of the most critical steps in the process is transferring the design onto the skin before tattooing. This is where transfer paper tattoo comes in. It allows you to transfer your design accurately, quickly, and without smudging. In this article, we’ll provide you with a comprehensive guide on how to use transfer paper tattoo.
Preparing for the Transfer
Before you start transferring the design onto the skin, you need to ensure that you’ve prepared adequately. Here are the steps you need to follow:
Choosing the Right Design
The first step is to choose the right design that your client wants. Ensure that you discuss the design in detail to avoid any miscommunication or misunderstandings. Once you’ve agreed on the design, you need to ensure that it’s the right size and that it fits the client’s body part well.
Preparing the Skin
The next step is preparing the skin for the transfer. Ensure that the area is clean and dry. Use alcohol wipes to clean the area and remove any excess oil or dirt. You can also use a stencil solution to help the transfer paper stick better.
Preparing the Transfer Paper
After preparing the skin, you need to prepare the transfer paper. Cut the transfer paper to the right size, ensuring that it fits the design correctly. Place the transfer paper on a flat surface with the stencil side facing up. Use a pen or pencil to trace the design onto the transfer paper. Ensure that you press hard enough to create a visible outline.
Applying the Transfer
Once you’ve prepared the skin and the transfer paper, it’s time to apply the transfer. Here are the steps you need to follow:
Placing the Transfer Paper
Place the transfer paper with the stencil side down onto the skin in the desired position. Ensure that the paper is facing the right way and that the design is centered correctly. Use a surgical pen to trace over the design to transfer the ink onto the skin.
Applying Pressure
Once you’ve traced over the transfer paper, use a tissue or cloth to remove any excess ink or moisture. Apply pressure to the design by using a clean, damp cloth or sponge. Ensure that you press firmly but gently to avoid smudging the ink.
Removing the Transfer Paper
After applying the pressure, carefully peel off the transfer paper. Ensure that you do it slowly and gently to avoid pulling off any ink. Once you’ve removed the transfer paper, you should see the design transferred onto the skin.
In conclusion, transferring a design onto the skin using transfer paper tattoo is an essential step in creating a tattoo. By following the steps outlined above, you can ensure that you transfer the design accurately, quickly, and without smudging. In the next section, we’ll discuss how to tattoo the design.
Applying the Transfer
After successfully transferring the design onto the skin, it’s time to start tattooing. Here are the steps you need to follow:
Placing the Transfer Paper
Using a surgical pen, trace over the transfer lines to make them more visible. This step will help you see the lines better while tattooing. Ensure that you take your time and trace over the lines correctly.
Applying Pressure
Once you’ve traced over the transfer lines, use a tissue or cloth to remove any excess ink or moisture. Apply pressure to the design by using a clean, damp cloth or sponge. Ensure that you press firmly but gently to avoid smudging the ink.
Removing the Transfer Paper
After applying the pressure, carefully peel off the transfer paper. Ensure that you do it slowly and gently to avoid pulling off any ink. Once you’ve removed the transfer paper, you should see the design transferred onto the skin.
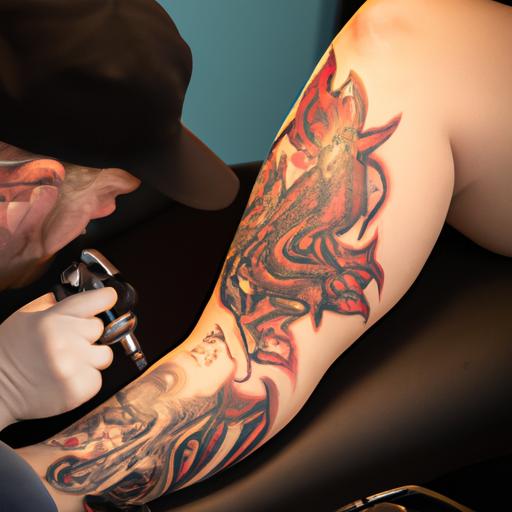
Tattooing the Design
Now that you have transferred the design onto the skin, it’s time to start tattooing. Here are the steps you need to follow:
Setting up the Tattoo Machine
Before you start tattooing, ensure that you’ve set up your tattoo machine correctly. Ensure that the machine is clean, sanitized, and has the right needles. Also, ensure that the ink is the right consistency and that you’ve chosen the right color.
Following the Transfer Lines
Using the transfer lines as a guide, start tattooing the design. Ensure that you follow the lines accurately and that you don’t deviate from them. Take your time and work slowly to ensure that you create a high-quality tattoo.
Tattooing the Design
Once you’ve started tattooing, ensure that you keep the skin taut to avoid any uneven lines or smudging. Also, ensure that you keep the needle at the right angle and that you use the right amount of pressure. Take breaks as needed to avoid hand fatigue and to ensure that you’re doing a good job.
In conclusion, transferring the design onto the skin is a crucial step in creating a high-quality tattoo. By following the steps outlined in this article, including how to apply the transfer paper and how to tattoo the design, you can ensure that you create a beautiful, long-lasting tattoo that your client will love. Remember to take your time, work carefully, and communicate with your client to ensure that you meet their needs and create a tattoo that they’ll cherish forever.
Aftercare
After tattooing the design, you need to ensure that the tattooed area is adequately cared for. This is essential to ensure that the tattoo heals correctly and maintains its quality. Here are the steps you need to follow:
Cleaning the Tattooed Area
The first step is to clean the tattooed area. Use lukewarm water and mild, fragrance-free soap to clean the area gently. Avoid using a washcloth or loofah as it can irritate the skin. Pat the area dry with a clean towel.
Applying Ointment
After cleaning the area, apply a thin layer of fragrance-free ointment to the tattoo. This will help keep the skin moisturized and promote healing. Apply the ointment two to three times a day for the first few days.
Covering the Tattoo
If the tattoo is in an area prone to rubbing or irritation, cover it with a sterile, non-stick bandage or gauze. This will help protect the tattoo and prevent any bacteria from entering the wound.
Conclusion
In conclusion, using transfer paper tattoo is an essential step in creating a high-quality tattoo. By following the steps outlined in this article, you can ensure that you transfer the design accurately and tattoo it with precision. Remember to prepare adequately, use the right materials, and follow proper aftercare to ensure that your tattoo lasts for a long time.
Here are some tips to keep in mind when using transfer paper tattoo:
- Ensure that the design is the right size and fits the body part well.
- Use the right materials, including transfer paper, stencil solution, and surgical pens.
- Apply pressure gently but firmly to transfer the design onto the skin.
- Follow proper aftercare to ensure that the tattoo heals correctly.
By following these tips, you can create a tattoo that your clients will love and cherish for years to come.