Table of Contents
Are you looking for a fun and easy activity to do with your kids or friends? Why not try building and flying paper airplanes? Not only is it a great way to spend time together, but it’s also an excellent opportunity to unleash your creativity and learn about aerodynamics.
In this article, we’ll show you how to build the best paper airplane step-by-step. We’ll also share some tips and techniques to make your paper airplane fly farther and faster.
Materials Needed
Before we get started, let’s gather the materials you’ll need to build your paper airplane. You’ll need a flat surface to work on, a sheet of paper, and a pair of scissors. You can use any type of paper, but we recommend using a lightweight paper like printer paper or origami paper.
Once you have your paper, you’re ready to start building your paper airplane. Remember, the quality of the paper and the accuracy of the folds can have a significant impact on the airplane’s performance.
To get the best results, make sure your paper is crisp and clean, and your folds are as precise as possible. If your paper is wrinkled or your folds are uneven, your paper airplane may not fly correctly.
Now that you have your materials let’s begin building the best paper airplane step-by-step.
Instructions
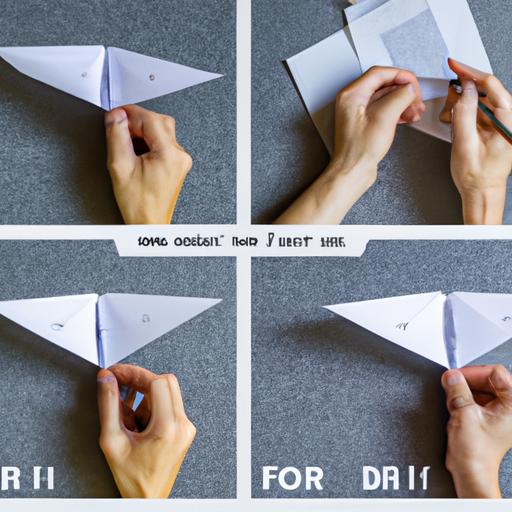
Step 1: Fold the paper in half horizontally, then unfold it.
Step 2: Fold the top corners of the paper down to the center crease, forming two triangles.
Step 3: Fold the newly formed top corners down to the bottom edge of the paper, creating a point at the top.
Step 4: Fold the paper in half along the center crease, hiding the point inside the fold.
Step 5: Fold the wings down from the center crease, making sure they’re even on both sides. The wings should be angled slightly upwards.
Step 6: Fold the wingtips up, creating a small triangular flap on each side.
Step 7: Pull down the flaps slightly to create wing flaps, and you’re done!
With these simple steps, you can create a basic paper airplane. However, if you want to take your paper airplane to the next level, try experimenting with different folds, shapes, and materials.
Tips for Success
To make the best paper airplane possible, it’s essential to pay attention to the details. Here are some tips to improve your airplane’s design and flying ability:
-
Use a lightweight paper: As mentioned earlier, using a lightweight paper like printer paper or origami paper will make your airplane fly better.
-
Make precise folds: The accuracy of your folds can have a significant impact on your airplane’s performance. Make sure your folds are sharp and even.
-
Adjust the wings: Slight adjustments to the wings can make a big difference in how your airplane flies. Experiment with different angles to find the best one for your airplane.
-
Launch correctly: Hold your paper airplane at the back of the wings, and launch it with a gentle toss. Avoid throwing it too hard or too high, as this can cause your airplane to stall or crash.
-
Avoid windy conditions: Wind can affect the flight of your paper airplane. Try to launch it in still conditions, or indoors.
By following these tips, you can create a paper airplane that not only looks great, but also flies impressively. In the next section, we’ll explore some common mistakes to avoid while building and flying your paper airplane.
Advanced Techniques
If you want to take your paper airplane building skills to the next level, here are some advanced techniques to try:
Adjusting the Wings
One of the simplest ways to improve your paper airplane’s performance is to adjust the wings. By bending the wings up or down, you can change the plane’s lift and drag, which can affect its speed and distance.
Experiment with different wing angles to see what works best for your paper airplane. Remember to make small adjustments at a time and test each change to see how it affects the plane’s flight.
Adding Weight
Adding weight to your paper airplane can also increase its speed and distance. However, be careful not to add too much weight, or it could affect the plane’s balance and cause it to crash.
You can add weight by folding a paper clip or a small piece of tape into the nose of the airplane. This will help the plane fly faster and farther, especially in windy conditions.
Making Unique Designs
Finally, why not try making your paper airplane stand out by creating unique designs? You can experiment with different paper colors, add stickers or draw designs on the wings.
You can also try folding your paper airplane in different ways to create new designs. There are many tutorials and templates available online to help you get started.
Conclusion
Building and flying paper airplanes is a fun activity that can be enjoyed by people of all ages. By following the steps outlined in this article, you’ll be able to build the best paper airplane that flies far and looks great.
Remember to experiment with different techniques and designs to find what works best for you. With a little practice, you’ll be able to create paper airplanes that soar through the air with ease. So why not gather some friends or family and start building your paper airplanes today?