
How to Make Paper Rings: A Beginner’s Guide
Table of Contents
Are you looking for a fun and easy craft project that you can do at home? Look no further than making paper rings! Paper rings are a great way to exercise your creativity and make something that is both beautiful and functional. Whether you want to make paper rings as a gift for a friend or family member, or just for yourself, this guide will walk you through the steps of making paper rings from start to finish.
Choosing the Right Paper
The first step in making paper rings is choosing the right paper. Not all paper is suitable for making paper rings, so it’s important to choose carefully. You will want to select a paper that is lightweight but sturdy enough to hold its shape when folded.
One type of paper that works well for making paper rings is origami paper. Origami paper is specifically designed for folding, so it is lightweight and easy to work with. You can find origami paper in a variety of colors and patterns, making it perfect for creating unique and colorful paper rings.
Another type of paper that works well for making paper rings is scrapbook paper. Scrapbook paper is thicker than origami paper, but it still has a lightweight feel to it. Scrapbook paper also comes in a variety of colors and patterns, making it a great choice for creating custom paper rings.
When choosing paper for your paper rings, it’s important to keep in mind the size of the ring you want to create. You will want to select a paper that is long enough to wrap around your finger at least once, but not too long that it becomes difficult to work with.
Measuring and Cutting the Paper
Once you have selected your paper, the next step is to measure and cut it into strips. The size of the strip you cut will depend on the size of the ring you want to create.
To measure the paper, wrap it around your finger and mark where the paper overlaps. Add a little bit of extra length to ensure that the paper strip will fit comfortably around your finger.
Using a ruler and a craft knife or scissors, cut the paper into a strip along the marked line. Be sure to cut the strip as straight as possible to ensure that the ring will look neat and tidy once it is folded.
Measuring and Cutting the Paper (continued)
Once you have cut the paper into a strip, it’s important to make sure that it is the right size before moving on to the next step. To do this, wrap the strip around your finger again and make sure that it fits comfortably.
If the strip is too long, you can trim it down a bit. If it is too short, you will need to start over with a new strip of paper.
When cutting the paper, it’s important to use a sharp craft knife or scissors to ensure a clean cut. A dull blade can cause the paper to tear or fray, which can make it difficult to create a neat and tidy paper ring.
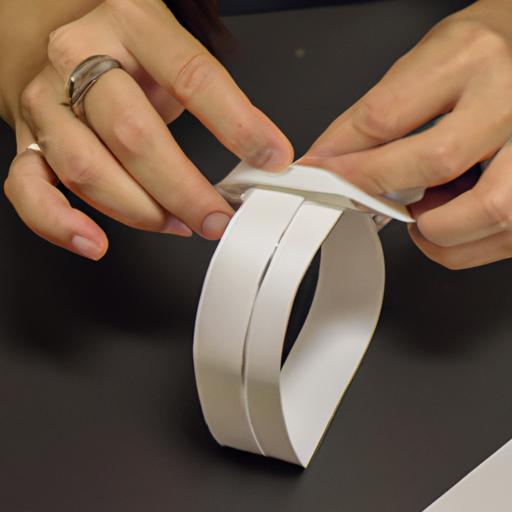
Creating the Ring
Now that you have the right size paper strip, it’s time to create the ring. Here are the steps to follow:
- Fold the paper strip in half so that the two ends meet.
- Take one end of the strip and fold it up and over the other end, creating a loop. The loop should be about the same size as your finger.
- Take the end of the strip that is now on top and fold it down and under the loop, creating a second loop.
- Tuck the end of the strip into the second loop, pulling it through to secure the ring.
Congratulations, you’ve just made a paper ring! If your ring doesn’t look perfect the first time, don’t worry. It may take a bit of practice to get the folding technique just right.
Here are a few tips to help you create a perfect paper ring:
- Use your fingernail or a bone folder to crease the paper as you fold it. This will help create crisp, clean lines.
- Make sure that the loops of the ring are the same size. If one loop is bigger than the other, the ring may not fit properly.
- Be gentle as you fold the paper. Too much pressure can cause the paper to tear or wrinkle.
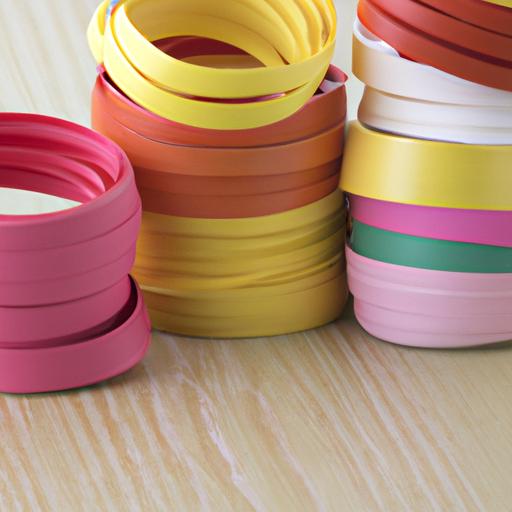
Decorating the Ring
Once you have created your paper ring, it’s time to add some decoration to it. There are many ways to decorate a paper ring, and the only limit is your creativity! Here are some ideas to get you started:
- Use markers, colored pencils, or paint to add designs or patterns to the paper.
- Glue on small beads, gems, or sequins for some extra sparkle.
- Wrap a thin ribbon or string around the ring and tie it in a bow or knot.
- Cut out small shapes or letters from other pieces of paper and glue them onto the ring for a personalized touch.
- Use washi tape or patterned tape to add some color and texture.
When decorating your paper ring, it’s important to keep in mind the size of the ring and the materials you are using. You don’t want to add too much decoration that it becomes bulky or uncomfortable to wear. It’s also important to use non-toxic materials that won’t harm your skin.
Conclusion
Congratulations, you have now learned how to make paper rings! Making paper rings is a fun and easy craft project that anyone can do. By following the steps outlined in this guide, you can create beautiful and unique paper rings that you can wear or give as gifts.
Remember, practice makes perfect, so don’t be afraid to experiment with different types of paper and decoration techniques. The more you practice, the better you will become at making paper rings.
So go ahead and give it a try! You never know what kind of amazing paper rings you will create when you let your creativity run wild.