
Big Paper Snowflakes

Funny thing: my post for last year’s Dare to Deck the Halls? Also giant snowflakes.
But! Last year I was too timid to write my own tutorial, so I found one on another blog and linked to it. Really, there are a gazillion tutorials on making these snowflakes; the world probably does not need another one. But, uhh, I’m writing one anyway. Because my kids asked to make these snowflakes again, and we’ve made them often enough that I can pretty much do it in my sleep now, and I wanted a brand new post for the last week of Dare to DIY, and I had to do something different this year….not just post more pictures of giant snowflakes hanging in my foyer.
I had hoped to also put a new twist on this year’s post by making our snowflakes out of pretty wrapping paper instead of regular copy or construction paper. This was kind of a big fail, though. For one thing, wrapping paper is floppy and difficult to work with. For another, as I completely forgot until I got started, it’s designed to only be pretty on one side. Doh!

Okay, so on to non-failing snowflakes! We first made these several years ago; I saw a tutorial on them on my homeschooling message board, and we whipped a few out and found them both easy and impressive (particularly given how easy they are). They’re super cheap, super fast (you can easily make one in under 15 minutes once you get the hang of it), and a good craft for kids to make or help you make (my 10 and 12 year olds can pretty much do them independently; the 8 year old still needs some help. But there are lots of parts that even a 4 or 5 or 6 year old could do with a bit of assistance).
Last year I invoked my poor spatial reasoning skills (those seem to come up a lot lately) to get out of writing my own tutorial, but this year I am equal to the task! What I lack in clarity I will make up for with excessive wordiness! Here we go:
These are the only things you need to make your giant snowflakes. Usually when people say you can make something with things you already have on hand, I find myself at Target an hour later. But even I generally have tape, scissors, a stapler, and white paper around. You can use whatever paper you want. Except wrapping paper. I don’t recommend that. Construction paper works well, though.

Take six sheets of paper and turn them into squares. I did this the first time by folding a triangle and then tearing off the excess (we’re all familiar with this technique from making paper fortune tellers in elementary school, yes?) but by the second one it occurred to me that I could also just measure, draw a line, and cut through all six sheets at once to save some time. Whatever you prefer:

At any rate, once you have your square, you need to fold your sheet in half to make a triangle:

Then fold it in half again to make a smaller triangle.
And then you’ll be ready for the very trickiest part of the whole thing: cutting the right way. If you screw up 14 times before you figure it out, it doesn’t really matter because it’s just plain copy paper. But I have made a handy visual aid in hopes of sparing you some frustration.
So you want to cut starting at the folded side, toward the unfolded, parallel to the longest side of the triangle. You’ll make 3 cuts, approximately evenly spaced (no need to measure or anything; this is a very forgiving sort of craft), stopping about 1/2 inch before you reach the other edge. I.e. make sure you don’t cut all the way across the triangle. Like so:
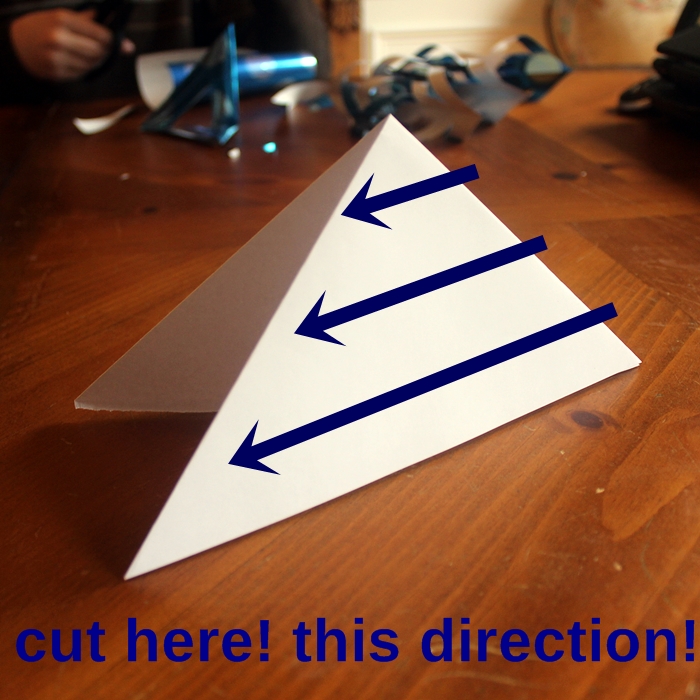
(mine’s partially unfolded just so you can see which side is which; you want it folded flat when you start to cut).
When you’ve done all your cuts, it should look like this:

And then when you unfold it, it should look like this:

Okay, now: start with the little flaps in the center and roll them up so that they’re overlapping slightly. Now tape them together. Like this:

Now flip the whole thing over. This is the other part that it’s easy to mess up, especially if you are eight or me. You want to do the same thing with the next set of tab things, only going the opposite way:

So now you have one loop facing down and one facing up. Now flip the whole thing over again and do it again. And then flip it and do the last set of tabs. Done! (with that part). It should look like this:

Now you need to make a total of six of these little guys.

Once you have them all, take three of them, join them together at the bottoms, and staple them:

Now they look like a beautiful flower with a stapler stem.
Now you want to join each individual piece to the piece next to it, also with the stapler. There’s nothing especially precise about this. Just find some flat parts around halfway down, press them together, maneuver the stapler in there, and staple:

One down, one to go:

Then do the same thing with your other group of three….thingies.
Now take the two sections and staple them together (where the stapler stem was in that picture up there):
Now you just need to take your last unjoined sections and staple them together in the middles like you did before. And then you’re done!
Here’s a snowflake just about to get its very last staple:

Phew! I hope that all made some degree of sense. Let me know if there’s anything I need to clarify.
I put all the pictures together in this big giant thing with numbers. For fun:

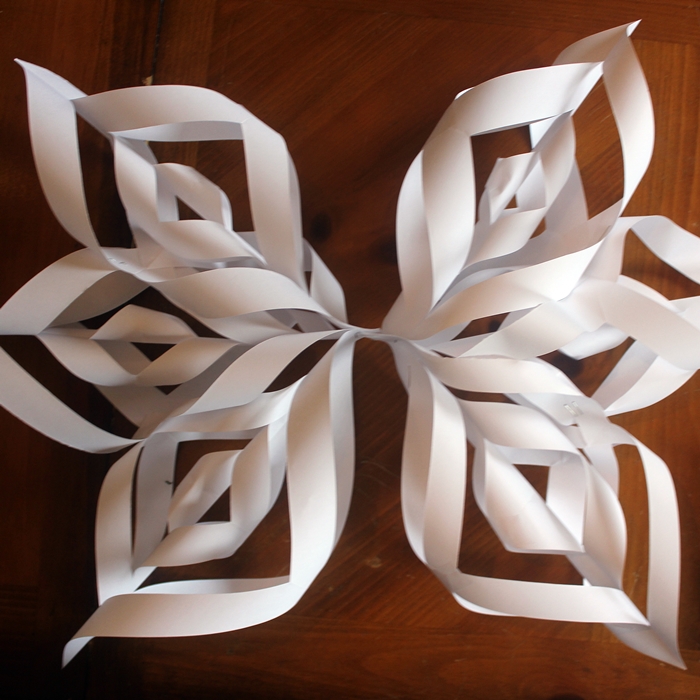
And here it is all finished and hung up (just tape or staple some ribbon to it for a hanger):

We hung them next to the silver tree in the foyer for extra merriment:

Linking up at Newly Woodwards for the Dare to Deck the Halls party

Also linking with:
The Inspiration Exchange
Thrifty Decor Chick
The Inspiration Gallery
Link Party Palooza