
How to Make Paper Mache Volcano: A Step-by-Step Guide
Table of Contents
Are you looking for a fun and educational activity to do with your kids? Making a paper mache volcano is an excellent idea! Not only is it an exciting project to work on, but it’s also a great way to learn about volcanoes and how they work. Plus, it’s a perfect opportunity to spend quality time with your children and bond over a shared experience.
In this article, we’ll provide you with a step-by-step guide on how to make a paper mache volcano. We’ll cover everything from materials needed to finishing touches, so you’ll be able to create a realistic-looking volcano that will impress everyone. So, let’s get started!
Materials Needed
Before we begin, let’s go over the materials you’ll need to create a paper mache volcano. You’ll need:
- A plastic bottle (1 or 2-liter)
- Cardboard or foam board
- Tape (masking or duct tape)
- Newspaper or tissue paper
- Flour or glue
- Water
- Paint (optional)
- Brushes (optional)
Each of these materials plays an essential role in creating a paper mache volcano. The plastic bottle will serve as the base of the volcano, while the cardboard or foam board will be used to create the structure. The tape will hold the cardboard or foam board in place, and the newspaper or tissue paper will be used to create the outer layer.
The flour or glue will be used to make the paper mache mixture, which you’ll apply to the volcano structure. Finally, if you want to add some color and make your volcano look more realistic, you can use paint and brushes.
Preparing the Base
The first step in making a paper mache volcano is to prepare the base. Take the plastic bottle and place it upside down on the cardboard or foam board. This will serve as the foundation of your volcano. Trace around the base of the bottle with a pencil, so you have a circle on the cardboard or foam board.
Next, cut out the circle using scissors or a craft knife. Then, place the bottle back on top of the cardboard or foam board circle. Use tape to secure the bottle to the cardboard or foam board. This will prevent the bottle from moving around when you start building the structure of the volcano.
Once you have the base secured in place, you can start building the structure of the volcano.
Creating the Volcano Structure
The next step in making a paper mache volcano is to create the structure. Take some cardboard or foam board and cut it into strips. Then, tape the strips around the base of the volcano, creating a cone shape.
Make sure to leave the top of the bottle open, as this is where the “lava” will come out. You can also use crumpled newspaper or tissue paper to add more shape and texture to the volcano. Use tape to secure the newspaper or tissue paper in place.
To make the volcano more realistic, you can add some features, such as a crater or vents. Use cardboard or foam board to create these features and tape them onto the volcano.
Applying Paper Mache
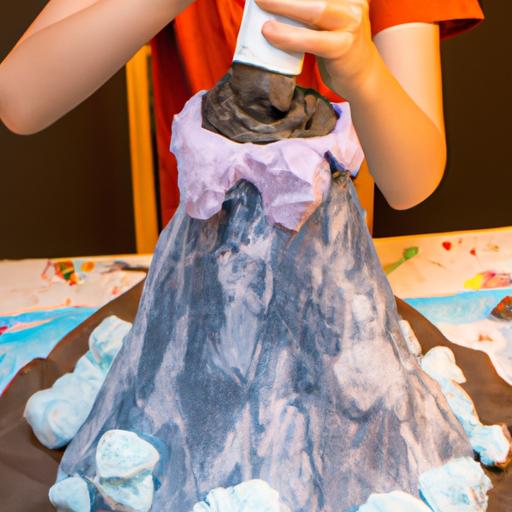
Now that you have the structure of the volcano, it’s time to apply the paper mache. To make the paper mache mixture, mix flour or glue with water until it forms a paste-like consistency.
Next, tear newspaper or tissue paper into small strips. Dip the strips into the paper mache mixture, making sure they are fully coated. Then, apply the strips to the volcano structure, making sure to smooth out any bumps or wrinkles.
Apply multiple layers of paper mache, allowing each layer to dry before applying the next. The more layers you apply, the stronger and more realistic your volcano will be.
Once you have finished applying the paper mache, allow the volcano to dry completely. This may take a few hours or even overnight, depending on how many layers you applied.
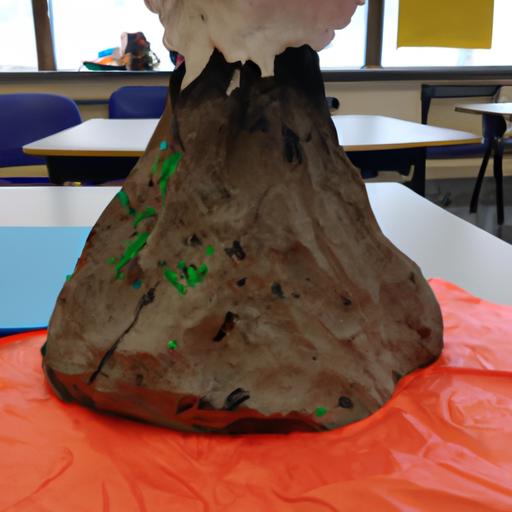
To make the volcano look even more realistic, you can paint it. Use brown or gray paint to create a natural-looking volcano. You can also add details such as rocks or vegetation using different shades of paint.
Congratulations! You have successfully made a paper mache volcano. Display it proudly and use it to teach your children about volcanoes and geology.
Applying Paper Mache
Now that you have the structure of the volcano ready, it’s time to apply the paper mache. Mix 1 part flour with 2 parts water to make the paper mache mixture. You can also use glue instead of flour if you prefer. Dip strips of newspaper or tissue paper into the mixture and apply them to the structure of the volcano. Make sure to cover the entire structure with the paper mache, leaving no gaps.
Apply at least two layers of paper mache to the volcano. Allow each layer to dry completely before applying the next layer. This will ensure that the paper mache is strong enough to support the weight of the volcano. Once you’ve applied all the layers, let the paper mache dry completely. This could take anywhere from a few hours to overnight, depending on the thickness of the layers.
Painting and Finishing Touches
Once the paper mache is dry, it’s time to paint and decorate the volcano. You can use acrylic paint or spray paint to color the volcano. Start by painting the entire volcano with a base coat, using a color that resembles the color of real volcanoes. Allow the base coat to dry completely before adding details.
Next, you can add details such as lava, rocks, and vegetation, depending on the type of volcano you’re making. For lava, you can use red, yellow, and orange paint to create a realistic effect. For rocks, you can use gray or brown paint. To create vegetation, you can use green paint and add small plants or trees around the base of the volcano.
To make the volcano look more realistic, you can add some finishing touches such as smoke or ash. You can use cotton balls or tissue paper to create smoke, and sprinkle some flour or baking soda to create ash. Be creative and have fun with it!
In conclusion, making a paper mache volcano is a fun and educational activity that you can do with your kids. By following this step-by-step guide, you’ll be able to create a realistic-looking volcano that will impress everyone. So, gather your materials, get creative, and have fun making your very own paper mache volcano!