
Ceramic Transfer Paper: An Innovative Tool for Pottery Design
Table of Contents
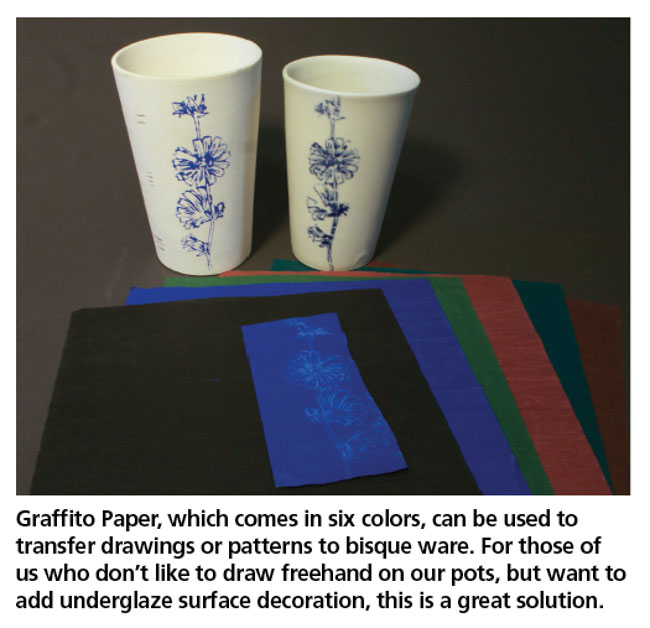
If you’ve ever wanted to add intricate designs or trace patterns onto your pottery with ease, then look no further. Introducing Graffito Paper, the new must-have tool for ceramic enthusiasts. This innovative product is like rice paper decal, but with a twist – you can customize the image to your liking. Let’s delve into the world of Graffito Paper and discover how it can revolutionize your pottery designs.
What is Graffito Paper?
Graffito Paper, created by Minnesota Clay Company, is the clay artist’s answer to carbon paper. With Graffito Paper, you can effortlessly transfer patterns, photocopies, or drawings to bisque ware using underglaze as ink. Embedded with one of six underglaze colors, Graffito Paper is a 9-inch square paper substrate that offers endless creative possibilities. Its colors range from classic black, green, blue, teal, and brown, to the unique rose color, which can only be fired to cone 06 due to its composition.
The Flexibility of Graffito Paper
One of the key features of Graffito Paper is its flexibility. The underglaze mixture applied to the sheets contains wax, which helps bind it to both the paper and bisqueware. This flexibility allows you to use Graffito Paper on curved surfaces as well as flat tiles or plates. However, keep in mind that when applying the paper pattern to a round surface, some adjustments may be necessary. Experiment with cutting plain paper to fit your desired form before trimming your image and Graffito Paper to size.
How to Use Graffito Paper
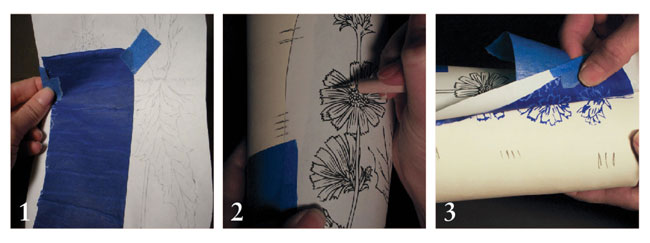
Using Graffito Paper is a straightforward process. Start by selecting your desired pattern and cutting it to size. Then, make registration marks on the pattern that extend to the edge of the paper. Attach the Graffito Paper to the back of your pattern or image using painters tape, ensuring a secure grip without damaging your pattern.
Next, lay the pattern over the bisqued piece and secure it with tape. Extend the registration marks from the paper to the piece to ensure precise alignment. Using a dull pencil, ballpoint pen, or the larger ball end of a sgraffito tool, trace over your pattern, pressing firmly. To maximize the number of tracings from the same printout, a sgraffito tool is recommended, as it keeps the original image legible for longer.
It’s essential to finish tracing the drawing before removing the paper. If you need to check your progress, lift only one edge of the papers and peel it away slowly, ensuring a proper transfer. Lay the paper back down carefully, smoothing out any creases. Before continuing to trace your pattern, double-check that the registration lines on the paper match those on the surface.
Adding the Finishing Touches
Once the image is transferred, you may notice some excess underglaze that needs cleaning up. Use a sharp tool to remove any unwanted residue. To set the transferred image or design, fire the bisqued piece to 500°F to burn off the wax. Alternatively, you can fire the piece to bisque temperatures again to set the underglaze pattern. Remember, if you decide to glaze the piece without first firing it to set the underglaze, the image area will resist the glaze.
When it comes to glazing, you can use any application method that you typically use with underglazes. Just ensure that you use either a clear or transparent glaze to avoid obscuring your image once the piece is fired. Depending on how firmly you press down when tracing over your image, the finished result can be solid and clean or give off a nostalgic vibe reminiscent of old mimeograph illustrations or carbon copy forms. Experiment with different glazes and techniques to achieve the desired effect.
Thank you to Minnesota Clay Company for providing samples of their incredible Graffito Paper for testing. With this innovative tool, the possibilities for designing unique and eye-catching pottery are endless.
First published in 2014